Cuddling Bunnies

Hi Everyone!  I saw this gorgeous post on Instagram from @lotsoflovelies and was inspired to create a vday card for a close friend of mine to give to her boyfriend!  It reminds me of the days that I have spent in Central Park with my husband, sitting on the grass, looking at the sky and just basking in the beauty and peace that a park in the middle of Manhattan can bring to one’s life.

See below for steps to reproduce:

  1. Create a 4″ x 4.25″ top-folding card base out of Neenah Solar White 110lb. Cardstock
  2. Use a Spellbinders Large Rectangle Die and Sizzix Square Die to create a polaroid frame
  3. Stamp the sentiment with Versamark Ink and heat emboss with Ranger Liquid Platinum Embossing Powder
  4. Stamp the bunnies from the Mama Elephant Honey Bunny Stamp Set onto Neenah Solar White 80lb. Cardstock using Memento Tuxedo Black Ink, color with Copic Sketch Markers (C1, C3, C5) and then fussy cut them
  5. Selectively stamp the flowers from the Mama Elephant Up and Away Stamp Set onto Neenah Solar White 80lb. Cardstock using Memento Gum Drop Dew Drops (Lilac Posies and Pear Tart) Ink and then fussy cut them
  6. Die-cut the grass using the Taylored Expressions Grass Border Die
  7. Mask off the area of the card base around the frame with Micropore Tape
  8. Blend the clouds using a stencil (purchased from Impress Cards and Crafts) and Hero Arts Soft Sky Shadow Ink
    1. You can also find free cut files that JJ Bolton has so generously posted on her blog and create your own cloud background stencil!
  9. Place a mask cut out of Full-Adhesive Post-It Notes over the polaroid area
  10. Stamp the striped background using the Impression Obsession Thick Stripes Cover-A-Card Stamp with Hero Arts Soft Granite Shadow Ink
  11. Adhere the grass, bunnies, flowers and frame to the card base
  12. Embellish the card with some Pretty Pink Posh Sparkling Sequins (4mm, 6mm)
  13. Shake your head in wonder at the depth of emotion that two bunnies, with their backs turned to you, can invoke!!

Thank you so much for visiting my blog today!

Winnie & Walter First Birthday Bash Challenge – Sketch & One

Hi!  I’m making my sixth submission to the Winnie & Walter Birthday Bash Celebration Challenges!  I can’t believe I went from never having submitted a card to a challenge due to lack of confidence to having created SIX challenge cards in the span of three weeks!!  It is so much fun and I am so grateful for all of the support and kind words that I’ve received from the unbelievably wonderful crafting community!  I will be submitting this card to the following challenges – Joni’s Sketch Challenge and Shay’s One Challenge.

It has been pretty darn cold in New York, so I looked through my wedding album (destination wedding in the Bahamas) and imagined myself in the warm, tropical weather of the Caribbean.  Since Valentine’s Day is near, I decided to make my husband a one-layer card reminiscent of the place where we met as well as where we were wed five years later.

See below for steps to reproduce:

  1. Create a top-folding A2 card base out of Neenah Solar White 110lb. Cardstock
  2. Create several masks for the beach, the ocean, the sun and the bunnies out of Post-It Full Adhesive Notes and 3M Micropore Tape
  3. Stamp the bunnies from the Mama Elephant Honey Bunny Stamp Set, color with Copics (0, W1, W3) and mask
  4. Create the beach by laying down a mask to protect the water line and blend with Antique Linen Distress Ink using Ranger’s Mini Ink Blending Tools
  5. Create the ocean by laying down masks to protect the beach and sky lines and blend with Distress Inks (Tumbled Glass and Salty Ocean) using Ranger’s Mini Ink Blending Tools
  6. Create the sky by laying down masks to protect the sun and ocean and blend with Distress Inks (Mustard SeedSpiced MarmaladeBarn Door and Salty Ocean) using Ranger’s Mini Ink Blending Tools
  7. Create the sun by removing the sun and ocean masks and blend with Distress Inks (Mustard Seed and Spiced Marmalade) using Ranger’s Mini Ink Blending Tools
  8. Stamp the sentiment from the Winnie & Walter The Big, The Bold and The Happy Stamp Set with Versafine Onyx Black Ink and heat emboss with clear embossing powder
  9. Stamp the birds and waves using the Lawn Fawn Float My Boat Stamp Set with Versafine Onyx Black Ink and Tumbled Glass Distress Ink
  10. Remove the bunny mask
  11. Think of how nice it would be to be with a loved one lying on a beach soaking in the sun with the water lapping at your feet….sigh

Thank you so much for visiting my blog!  Hope this card warmed you up a bit during this cold winter!

Winnie & Walter First Birthday Bash Challenge – In Rotation & Distress Patterns

Hi!  I’m submitting my fifth card to the Winnie & Walter Birthday Bash Celebration Challenges!  I have had so much fun these past two weeks playing along with the Winnie & Walter challenges and I am so happy that there are two more weeks!  YEAH!!  I will be submitting this card to the following challenges – Kelly’s In Rotation Technique Challenge and Mayuri’s Distress Inks & Patterns Challenge.

Combining these two challenges together was super hard for me because most of my Winnie & Walter stamps are sentiment stamps and because I generally use Distress Inks for techniques!  I checked out Mayuri’s blog for some inspiration and just love how her cards have such bold and bright colors with a loads of white space.  I decided to give it a shot.  What do you think?

See below for steps to reproduce:

  1. Create a top-folding A2 card base out of Neenah Solar White 110lb. Cardstock
  2. Stamp and rotate the solid leaf from the Winnie & Walter The Big, The Bold and The Extras Stamp Set with Distress Ink Pads (Barn Door, Spiced Marmalade, Mustard Seed, Mowed Lawn, Salty Ocean, Seedless Preserves) to create a bold and colorful patterned background
  3. Stamp the sentiment from the Winnie & Walter The Big, The Bold and You Stamp Set with Versafine Onyx Black Ink onto a strip of vellum and heat emboss with clear embossing powder
  4. Embellish the card with assorted Pretty Pink Posh (6mm Lemon Drop, 6mm Shamrock, 6mm Cobalt, 6mm Amethyst and 4mm Sparkling Clear) and Doodlebug Sequins (Ladybug and Tangerine)
  5. Adhere the card together using double-sided adhesive
  6. Go back and forth in your head for an hour debating whether the card needs something more and then decide to stop fussing and enjoy the cheery rainbow of colors!

Thank you so much for visiting my blog!

Winnie & Walter First Birthday Bash Challenge – One & Shaker

Hi!  I’m back to play with some more Winnie & Walter Birthday Bash Celebration Challenges!  This will be my fourth submission to the event!  I will be submitting this card to the challenges thrown by the incredibly talented founders of W&W – Shay’s One Challenge and Julie’s Shaker Challenge.

I decided to make a birthday card for these two lovely ladies using their logo’s fun and cheery color scheme!!  Hope they like it!

I don’t know why I’m having such a hard time deciding between whether to make a card a shaker or not!!  I think it’s because I want to make EVERYTHING into a shaker card!!  haha  Which one do you like more??

See below for steps to reproduce:

  1. Create a top-folding A2 card base out of Neenah Solar White 110lb. Cardstock
  2. Cut a frame out of a 4.25″ x 5.5″ piece of Neenah Solar White 80lb. Cardstock using the Spellbinders A2 Matting Basics A Dies
  3. Stamp the background with second-generation stamping using the Winnie & Walter Big Bang Confetti Stamp Set with Memento Dye Inks (Lilac Posies, Tangelo, Dandelion, Pear Tart) and ColorBox Petal Point Cyan Pigment Ink
  4. Stamp the balloons using the Mama Elephant Balloon Letters Stamp Set with Memento Dye Inks (Lilac Posies, Tangelo, Dandelion, Pear Tart) and ColorBox Petal Point Cyan Pigment Ink and fussy cut
  5. Stamp the sentiment from the Winnie & Walter The Big, The Bold and The Happy Stamp Set with Versamark Ink and heat emboss with Hero Arts Silver Embossing Powder
    1. I stamped with Versafine Onyx Black Ink and heat embossed with Clear Embossing Powder for the shaker card
  6. Embellish the card/Fill the shaker with assorted Pretty Pink Posh (6mm Pink Peonies, 6mm Tangerine, 6mm Marigold, 6mm Mossy Green and 6mm Aquamarine) and Doodlebug Sequins (Lily White)
  7. Adhere the card together using some foam tape (I doubled up on the foam tape for this card so that there is more room to shake!) and double-sided adhesive
    1. Tip: Use a powder tool on the inside of the shaker and along the edge of the foam tape to reduce static and prevent the sequins from sticking to the borders
  8. To Shake or Not to Shake?  That is the question!

Thank you so much for visiting my blog!  I have become quite addicted to The Winnie & Walter First Birthday Bash Challenges.  I hope you get a chance to play along so that I can look at your beautiful creations!

Winnie & Walter First Birthday Bash Challenge – In Rotation & Shaker

Hi!  I’m back to play with some more Winnie & Walter Birthday Bash Celebration Challenges!  This will be my third submission to the event!  I will be submitting this card to the following challenges – Kelly’s In Rotation Technique Challenge and Julie’s Shaker Challenge.

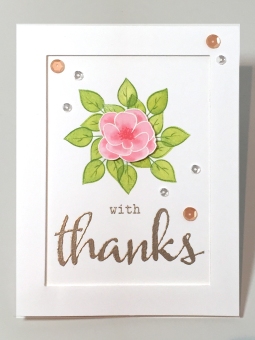
So I’m not sure if I’m interpreting the “In Rotation” challenge as it was meant to be interpreted since I’m basically just rotating stems and leaves to make….well, a bed of leaves for a flower.  I hope this qualifies!

I seriously could not decide whether I liked this card as a shaker so I made it without the shaker element and I still can’t decide!!  Maybe you can help me out??  Which one do you like more?

Photo Jan 08, 9 32 19 PMPhoto Jan 08, 9 09 14 PM

See below for steps to reproduce:

  1. Create a top-folding A2 card base out of Neenah Solar White 110lb. Cardstock
  2. Cut a frame out of a 4.25″ x 5.5″ piece of Neenah Solar White 80lb. Cardstock using the Spellbinders A2 Matting Basics A Dies
  3. Stamp the flower from the Winnie & Walter The Big, The Bold and The Extras Stamp Set with Versamark Ink and heat emboss with Hero Arts White Embossing Powder
  4. Use Worn Lipstick Distress Ink to watercolor the flower and set aside to air dry
  5. Stamp the outline leaves from the Winnie & Walter The Big, The Bold and The Extras Stamp Set in rotation with Avery Elle Celery Pigment Ink
  6. Stamp the solid leaves from the Winnie & Walter The Big, The Bold and The Extras Stamp Set using the Rock n’ Roll technique with Avery Elle Pigment Inks (Celery and Lemon Grass)
  7. Stamp the sentiment from the Winnie & Walter The Big, The Bold and You Stamp Set with Versamark Ink and heat emboss with Ranger Liquid Platinum Embossing Powder
  8. Embellish the card/Fill the shaker with assorted Pretty Pink Posh (4mm Sparkling Clear and 6mm Sand) and Doodlebug Sequins (Lily White, Cupcake and Limeade)
  9. Adhere the card together using some foam tape (I doubled up on the foam tape for this card so that there is more room to shake!) and double-sided adhesive
    1. Tip: Use a powder tool on the inside of the shaker and along the edge of the foam tape to reduce static and prevent the sequins from sticking to the borders
  10. Compare the two cards you just made and figure out which one you like better….

Thank you so much for visiting my blog!  The Winnie & Walter First Birthday Bash Challenges have really increased my crafting time because they are so much fun!  Sometimes I even dream about cards!!  Now all I have to do is learn how to use a camera/Photoshop so that my photos come out looking like my cards!!!  Ggggrrrrrr!!!!