Inky Backgrounds with Altenew!

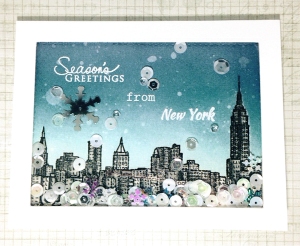
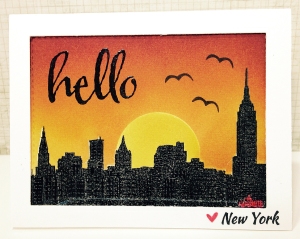
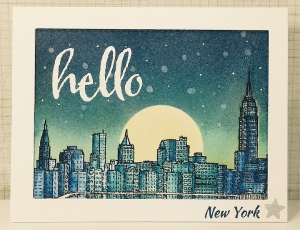
Hi!  I played with my Altenew Sketchy Cities America stamp set for the Altenew Instagram video challenge and the Simon Says Stamp Wednesday Challenge and got super inky with it (and now that Will Smith song is stuck in my head….waaaaah)!!  I couldn’t decide what kind of inky background I wanted so I created three!  And  yes, one is a holiday card but that background was singing christmas carols to me so I just had to do it!  hehe  Do you have a preference over these inky backgrounds behind a gorgeous New York City skyline?!
Altenew Sketchy Cities 2Altenew Sketchy Cities 3See below for steps to reproduce:

  1. Create a cardbase out of Neenah Solar White 110lb. Cardstock
  2. Create a frame using the stitched rectangle die from the Mama Elephant Basic Set Creative Cuts out of Canson 90lb Cold Press Watercolor Paper
  3. Stamp the New York City skyline from the Altenew Sketchy Cities America Stamp Set with Versafine Smokey Gray Ink and heat emboss with Ranger Clear Embossing Powder
  4. Create a mask for the Altenew New York City skyline and a circle out of Inkadinkado Stamping Mask Paper
  5. Mask the cityscape and create inky backgrounds with the following Distress Inks:
    1. Tumbled GlassSalty Ocean, Faded Jeans, Chipped Sapphire
    2. Tumbled GlassSalty Ocean, Faded Jeans, Chipped Sapphire, Dusty Concord, Antique Linen
    3. Mustard Seed, Spiced Marmalade, Barn Door, Dusty Concord
  6. Stamp a sentiment with the Papertrey Ink Signature Christmas Stamp Set, Winnie & Walter The Big The Bold and The Happy and Altenew Sketchy Cities America Stamp Set using Versamark Ink and heat emboss with Hero Arts White embossing powders
  7. Mist some water on the inky background with a Ranger Mini Mister filled with water and Tsukineko Sheer Shimmer Spritz
  8. Adhere the card together using foam tape and double-sided adhesive
  9. Embellish/Fill with some Pretty Pink Posh Sequins (8mm Sparkling Clear6mm Sparkling Clear, 4mm Sparking Clear, 6mm Winter Snow Mix), Doodlebug Lily White Sequins and Simon Says Stamp Snowflake Sequins
  10. Scrub really hard to clean those inky fingers that will take days to go back to normal flesh color!  haha

I will be submitting these cards to the Simon Says Stamp Wednesday Challenge Blog | Use Your Favorite Technique and/or Product.

Thank you so much for visiting my blog today and Happy Crafting!
Winter Friends!

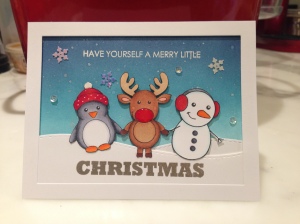
I hope you enjoyed a wonderful holiday season and a start to a great New Year!  I know that Christmas is well over but I couldn’t post any of my holiday cards since I didn’t want any of my friends to see what I was sending out before they received it!  I made this card for one of my best friends who lives in Seattle.  I usually use a trio of images for any card I make her because alongside her, I am blessed to have a bestie who lives only ten blocks away from me!  These two are the most wonderful and caring friends and I am so lucky to have them in my life.  I love them so much!!

See below for steps to reproduce:

  1. Create a cardbase out of Neenah Solar White 110lb. Cardstock
  2. Create a frame using the stitched rectangle die from the Mama Elephant Basic Set Creative Cuts out of Neenah Solar White 80lb. Cardstock
  3. Create snow hills using the hill dies from the Mama Elephant Landscape Trio Creative Cuts out of Neenah Solar White 80lb. Cardstock
  4. Stamp the penguin, reindeer and snowman from the Simon Says Stamp with Clearly Besotted Stamptember Exclusive Winter Friends Stamp Set onto Neenah Solar White 80lb. Cardstock
    1. Color with copic markers (or any other medium you wish to use)
    2. Fussy cut the images with EK Tools Honey Bee Scissors
  5. Create the sky by blending Distress Inks (Tumbled GlassBroken China, Faded Jeans) and flicking water with a small paintbrush
  6. Stamp the sentiment from the Mama Elephant Believe in Magic Stamp Set using Versamark Ink and heat emboss with Ranger Liquid Platinum and Hero Arts White embossing powders
  7. Adhere the card together using some foam tape and double-sided adhesive
  8. Embellish with some Pretty Pink Posh 6mm Sparkling Clear Sequins and Simon Says Stamp Snowflake Sequins
  9. Use a Clear Glitter Wink of Stella Brush Tip Marker to add some shimmer to the parts of the images colored in red
  10. Add Glossy Accents to make the reindeer’s nose shiny!
  11. Send the card out and wait for your friend to be blown away (which she was)!

Thank you so much for visiting my blog today and Happy Crafting!  Here’s to an AMAZING NEW YEAR!!
Mistletoe Kisses!

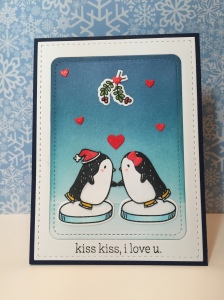
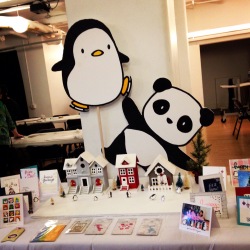
I was lucky enough to go celebrate Mama Elephant’s 2nd anniversary at their birthday party in Manhattan!!  It was so much fun to meet Kryssi and Angela as well as make some tags/cards with some new crafty friends!  Even my non-crafty sister who rolled her eyes at me when I dragged her to the party got into the swing of things and made two cards!  I definitely did some damage to my crafting budget at their their little pop-up shop but how can you resist their cute stamps?!?!  AND I was so happy to get my hands on the Mama Elephant Arctic Penguins Stamp Set a couple of days early!!

Look at this AMAZING display they created for the event!

Mama Elephant BDay - 10.11.2014

My card was inspired by the super cute holiday cards created by the lovely Kristina Werner and Laura Bassen.

I made this card for my hubby and can’t wait to give it to him on Christmas!  I hope I get a big smackeroo for this one!

Mistletoe Kisses

See below for steps to reproduce:

  1. Create a frame using the stitched rectangle dies from the Mama Elephant Basic Set Creative Cuts and the Lawn Fawn Journaling Card Lawn Cuts out of Neenah Solar White 80lb. Cardstock
  2. Create the cardbase with a 1/4″ matte around the frame out of Bazzill Admiral Cardstock
  3. Stamp the sentiment from the Mama Elephant Pandamonium Stamp Set using Memento Tuxedo Black Ink on the frame
  4. Stamp the cute little penguins, floating ice, santa hat and mistletoe from the Mama Elephant Arctic Penguins Stamp Set onto Neenah Solar White 80lb. Cardstock, color with copics and fussy cut or die cut
  5. Create the ice rink and sky by blending Distress Inks (Tumbled GlassBroken China, Faded Jeans)
  6. Adhere the card together
  7. Embellish with some little hearts
  8. Use a Clear Glitter Wink of Stella Brush Tip Marker to add some shimmer to the hearts, santa hat and mistletoe.
  9. Wait for your hubby to give you some much deserved smooches underneath the mistletoe!

Thank you so much for visiting my blog today and Happy Crafting!  It’s never too early to get started on holiday cards!  =)
Holy Hugs, Bat Girl!

The moment I saw the Simon Says Stamp/Mama Elephant Super Duo Stamp Set, I knew, in my heart of hearts, that I was going to go over my crafting budget to my husband’s chagrin.  I made a deal with him and said that I would wait to order until the end of September, and if it was still in stock, it was fate and I’d get it.  In mid-September, the dies AND stamps sold out and I was CRUSHED.  When the stamps came back in stock, you bet your butt, I reneged on our deal and made an order despite having to pay for shipping!  haha

My card was inspired by the unbelievably talented and creative Nicole Magouirk:

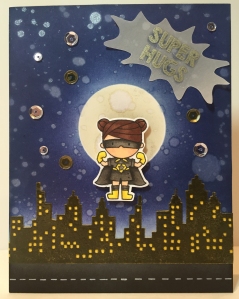
I made this card for a very close friend who LOVES her batman comics (and yes, she is over 30…haha).  These little super kids are so cute that I squeal every time I look at them!

Mama Elephant Super Duo Holy Hugs

See below for steps to reproduce:

  1. Cut an A2 card base out of Neenah Solar White 110lb. Cardstock
  2. Cut an A2 size rectangle out of Neenah Solar White 80lb. Cardstock
  3. Cut a circle mask out of Inkadinkado Masking Paper and keep both the positive and negative
  4. Stick the positive circle mask on the A2 rectangle to create the moon and blend Distress Inks (Broken China, Faded Jeans, Chipped Sapphire, Dusty Concord) to create a night sky
  5. Stick the negative mask and lightly blend Pumice Stone Distress Ink on the “moon”
  6. Mix Perfect Pearls Pigment Powder with water and splatter across blended background to create some twinkling stars
  7. Also splatter some water across the blended background to create more stars
  8. Use Simon Says Stamp/Mama Elephant Super Duo Stamp Set to stamp Super Girl, color with Copics and then fussy cut the image (or use the Super Duo Creative Cuts if you were lucky enough to get them before they sold out!)
  9. Use Mama Elephant Central Park Stamp Set to stamp the skyline image on yellow cardstock with Hero Arts Charcoal Ink and clear heat-emboss.
  10. Fussy cut the skyline and adhere to card
  11. Blend Black Soot Distress Ink under the skyline and use a White Sakura Gelly Roll Pen to create a road
  12. Use Scotch Foam Tape to pop up Super Girl
  13. Use the Simon Says Stamp/Mama Elephant Super Duo Creative Cuts to die cut the super hero speech bubble (if you’re lucky, I unfortunately do not have it and had to fussy cut), Stamp and clear heat-emboss the “Super Hugs” sentiment with Encore Ultimate Metallic Champagne Pigment Ink and adhere to card
  14. Use Doodlebug Designs Assorted Sequins and Pretty Pink Posh Sparkling Clear Sequins to add some more stars to the blended night sky!
  15. Sit back and squeal with the cuteness that is this card!!

Thank you so much for visiting my blog today!!  If you have this stamp set, I hope you are enjoying it as much as I am and if you don’t, GO GET IT!!!  haha