Pandamonium Note Card Gift Sets!

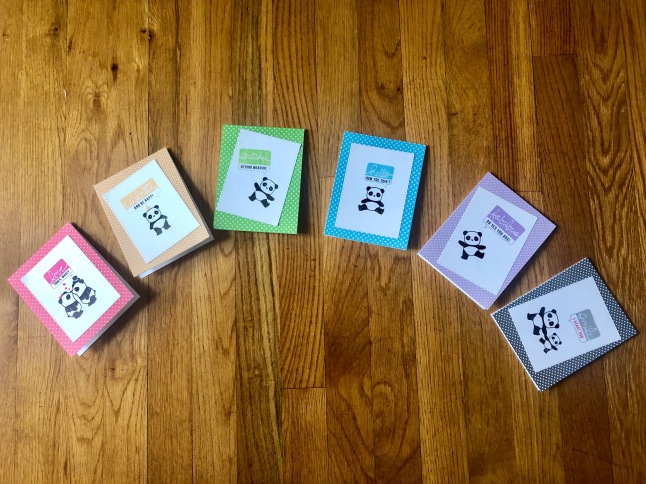
It has been FOREVER since I’ve posted on my blog but I made these note card gift sets for my daughter’s teachers that I am absolutely in LOVE with!!!  I think they are so stinkin’ cute!!!

I created three sets of note cards inspired by this Pinterest post.

Mama Elephant Pandamonium Note Card Gift Set

See below for steps to reproduce:

  1. Create A2 top-folding landscape card bases out of Neenah Solar White 110lb. Cardstock
  2. Create stitched rectangles using the second largest die from the Simon Says Stamp Stitched Rectangles Wafer Dies out of Neenah Solar White 80lb. Cardstock
  3. Create 4.25″ x 5.5″ (A2size) rectangles out of the Tiny Dot Digital Patterned Paper generously provided for free to download and print by Mel McCarthy on flickr
    1. Try your hand at using the overlay image in Photoshop if you want to get patterned paper closer to matching your ink color
  4. Stamp the pandas using the Mama Elephant Pandamonium Stamp Set
  5. Stamp the word bubbles using the Mama Elephant Hello Stamp Set (DISCONTINUED) in the following ink colors: Altenew Coral Berry, Memento Canteloupe, Hero Arts Green Hills, Altenew Ocean Waves, Altenew Lavender Fields, Hero Arts Soft Granite
  6. Adhere everything together using the Scotch Advanced Tape Glider
  7. Box these notecards up and gift/send some happy mail to a few people in your life!!

Thank you so much for visiting my blog today and Happy Crafting!

Inky Backgrounds with Altenew!

Hi!  I played with my Altenew Sketchy Cities America stamp set for the Altenew Instagram video challenge and the Simon Says Stamp Wednesday Challenge and got super inky with it (and now that Will Smith song is stuck in my head….waaaaah)!!  I couldn’t decide what kind of inky background I wanted so I created three!  And  yes, one is a holiday card but that background was singing christmas carols to me so I just had to do it!  hehe  Do you have a preference over these inky backgrounds behind a gorgeous New York City skyline?!

Altenew Sketchy Cities 2Altenew Sketchy Cities 3See below for steps to reproduce:

  1. Create a cardbase out of Neenah Solar White 110lb. Cardstock
  2. Create a frame using the stitched rectangle die from the Mama Elephant Basic Set Creative Cuts out of Canson 90lb Cold Press Watercolor Paper
  3. Stamp the New York City skyline from the Altenew Sketchy Cities America Stamp Set with Versafine Smokey Gray Ink and heat emboss with Ranger Clear Embossing Powder
  4. Create a mask for the Altenew New York City skyline and a circle out of Inkadinkado Stamping Mask Paper
  5. Mask the cityscape and create inky backgrounds with the following Distress Inks:
    1. Tumbled GlassSalty Ocean, Faded Jeans, Chipped Sapphire
    2. Tumbled GlassSalty Ocean, Faded Jeans, Chipped Sapphire, Dusty Concord, Antique Linen
    3. Mustard Seed, Spiced Marmalade, Barn Door, Dusty Concord
  6. Stamp a sentiment with the Papertrey Ink Signature Christmas Stamp Set, Winnie & Walter The Big The Bold and The Happy and Altenew Sketchy Cities America Stamp Set using Versamark Ink and heat emboss with Hero Arts White embossing powders
  7. Mist some water on the inky background with a Ranger Mini Mister filled with water and Tsukineko Sheer Shimmer Spritz
  8. Adhere the card together using foam tape and double-sided adhesive
  9. Embellish/Fill with some Pretty Pink Posh Sequins (8mm Sparkling Clear6mm Sparkling Clear, 4mm Sparking Clear, 6mm Winter Snow Mix), Doodlebug Lily White Sequins and Simon Says Stamp Snowflake Sequins
  10. Scrub really hard to clean those inky fingers that will take days to go back to normal flesh color!  haha

I will be submitting these cards to the Simon Says Stamp Wednesday Challenge Blog | Use Your Favorite Technique and/or Product.

Thank you so much for visiting my blog today and Happy Crafting!

Pretty Pink Posh: Watercolor Blog Hop – Smile

Hi!  I am so stoked that I was able to find some time to create a second card for the Pretty Pink Posh Watercolor Blog Hop!  There are so many amazing entries and I am so floored by the talent that is out there.  All of the wonderful entries have really inspired me to give watercoloring another go.  I’m still trying to get the hang of watercoloring so please don’t judge me too harshly!

I am in LOVE with Phyllis Harris illustrations and am so happy that she designs for Unity Stamp Company.  I decided to try my hand at watercoloring one of my favorite images of hers.  What do you think?

See below for steps to reproduce:

  1. Create an A2 card base out of Neenah Solar White 110lb. Cardstock
  2. Use the Mama Elephant Basic Set Creative Cuts to create a frame out of Neenah Solar White 110lb. Cardstock
  3. Cut an A2-size rectangle out of Tim Holtz Watercolor Paper
  4. Stamp the girl from the Unity Stamp Company Face the Sunshine Stamp Set with VersaFine Vintage Sepia and heat emboss with clear embossing powder
  5. Use Kuretake Zig Clean Color Real Brush Markers (071 Flesh Color021 Light Carmine, 091 Light Gray050 Yellow052 Bright Yellow, 041 Light Green, 044 Deep Green, 065 Mid Brown) to watercolor the stamped image
  6. Wash the sky and grass with Tumbled Glass Distress Ink and Peeled Paint Distress Ink, respectively
  7. Stamp the sentiment from the Unity Stamp Company Insightful Meadow’s Stamp Set with VersaFine Vintage Sepia
  8. Adhere everything together using the Tombow Mono Adhesive Dots Tape Runner
  9. Embellish with Pretty Pink Posh Sequins (6mm Sparkling Clear, 4mm Sparkling Clear) using Zots Bling Dots
  10. Send a bit of happy mail to a friend and spread a little sunshine in their life!

Thank you so much for visiting my blog today and I hope you get a chance to hop along with Pretty Pink Posh!

Happy Crafting!!

Pretty Pink Posh: Watercolor Blog Hop – Delightful Dahlias

Hi!  I have jumped on the Kuretake Zig Clean Color Real Brush craze and am so excited that they came in time for me to participate in the Pretty Pink Posh Watercolor Blog Hop!!! I ended up ordering the 36-color set from Amazon and they were delivered within the same day as when they shipped!  Gotta love Amazon.  See below for a thank you card that I made for my neighbors using these newly-acquired markers.  I gotta say that they are AMAZING!  I love how vibrant and easy they are to use!!

See below for steps to reproduce:

  1. Create an A2 card base out of Neenah Solar White 110lb. Cardstock
  2. Use the Mama Elephant Basic Set Creative Cuts to cut a stitched rectangle out of Tim Holtz Watercolor Paper and wash with Tumbled Glass Distress Ink
  3. Use the Mama Elephant Thanks Script Creative Cuts to die-cut the sentiment
  4. Stamp the dahlias and leaves from the Papertrey Ink Delightful Dahlia Stamp Set with Versamark Ink onto Tim Holtz Watercolor Paper and heat emboss with Hero Arts White Embossing Powder
  5. Use Kuretake Zig Clean Color Real Brush Markers (022 Carmine Red, 070 Orange050 Yellow052 Bright Yellow, 041 Light Green, 047 May Green) to watercolor the stamped images and fussy-cut
  6. Adhere everything together using the Tombow Mono Adhesive Dots Tape Runner
  7. Embellish with Pretty Pink Posh Sequins (6mm Sparkling Clear, 4mm Sparkling Clear, 6mm Tangerine, 4mm Tangerine, 6mm Marigold, 4mm Marigold) using Zots Bling Dots
  8. Marvel at how vibrant and easily you were able to blend the color on these flowers!!

Thank you so much for visiting my blog today and I hope you get a chance to hop along with Pretty Pink Posh!

Happy Crafting!!

My First Scrapbook Page

I was asked to create a scrapbook page for one of my long-time friends (I’ve known her since Kindergarten!) who is getting married this year!!  I have never created a scrapbook page before and I gotta say, it is HARD to think about what to do with all that space!!!  I am truly grateful that handmade cards have a more manageable, for me, creative space to work on.  I’m not in love with this layout but I had a deadline to meet and after many hours of pulling my hair out, I decided to go with the below:

See below for steps to reproduce:

  1. Grab an 8.5″ x 11″ sheet of patterned paper (I used a sheet of Pretty Party Invitation Pattern Paper by Crate Paper)
  2. Use the Jasmine Cricut Cartridge on an Cricut Expression 2 (or any other electronic die-cutting machine) to cut personalized names out of DCWV gold foil
  3. Die-cut two film strips using the Pretty Pink Posh Film Strip Die out of 80lb. Ash Cardstock from Paper Presentation
  4. Trace the die twice out on 80lb. Neenah Solar White Cardstock and fussy-cut to back the film-strip die-cuts with Honey Bee Scissors
  5. Cut a 4.25″ x 6.25″ rectangle out of 80lb. Neenah Solar White Cardstock and lightly blend Distress Inks (Antique Linen, Spun Sugar) with a mini ink blending tool.
  6. Stamp the vase from The Ton Stamps Fresh Cut Peonies Stamp Set using Hero Arts Soft Granite Shadow Ink on 80lb. Neenah Solar White Cardstock and vellum and fussy-cut
  7. Stamp the three-step flowers from The Ton Stamps Fresh Cut Peonies Stamp Set using Distress Inks (Spun Sugar, Worn Lipstick) with this very helpful stamping guide and MISTI and fussy-cut
  8. Stamp the two-step leaves from the Papertrey Ink The Sweet Life Stamp Set using Avery Elle Pigment Inks (Lemon Grass, Celery) and fussy-cut
  9. Stamp the sentiment from the Papertrey Ink Wet Paint III Stamp Set on vellum using Versamark Ink, heat emboss with Hero Arts Gold Embossing Powder and die-cut using Sizzix Fancy Labels No. 3 Framelits
  10. Embellish with a couple of Pretty Pink Posh sequins (Sparkling Clear Assorted, Pretty Peonies 4mm)
  11. Adhere everything together using the Scotch Advanced Tape Glider and Zig Two-Way Glue Pen
  12. Take a moment to sit back and remember some wonderful times you have had over the years with your life-long friend(s)!!  Make sure to tell them you love them!!

Thank you so much for visiting my blog today and Happy Crafting!